


You want to explore resin art so you can explore the dazzling world of resin arts and free your creative side. The alluring artistic medium has exploded within the art world by transforming dull objects into remarkable artworks. The versatile art form of resin gives artists both beginners and experienced experts opportunities to explore limitless creative possibilities. Colorful patterns as well as exceptional textural effects and individualized styles present themselves to artists who seek to discover this active artistic trend. A journey awaits you to learn the essential aspects of resin art which will empower you to make enchanting artworks of your own.
The Popularity of Resin Art Trends
Resin art has become an unstoppable creative phenomenon which gained dominance in artistic circles. The colorful appearance combined with its glossy finish makes it impossible for people to look away from other art media. Many artists together with recreational artists choose resin art because of its diverse applications.
The growing popularity of this trend depends heavily on the social media platforms TikTok and Instagram. Through online sharing of their beautiful work people encourage others to learn resin design concepts.
Numerous instructional videos on the internet allow new artists an easy entrance into the world of this interesting art form. The resin art community warmly accepts new members who seek advice and strategies from its welcoming group.
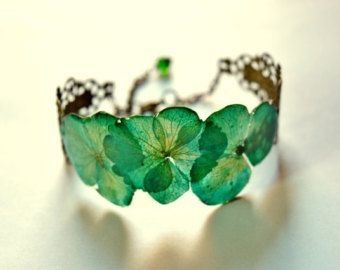
Users can transform each finished piece to suit their personal preferences because customization options are available. All types of preferences will find something appealing among the various resin products like coasters as well as jewelry and wall art. The wide range of appeal makes resin art extremely popular since it appeals to audiences with different artistic interests or who wish to buy decorative household items.
Types of Resin Used in Art
Resin art depends mainly on epoxy resin due to its clear and durable properties. The epoxy resin type works best for finishing artwork through a high-gloss sheen that intensifies both color visibility and detailed elements.
Polyester resin is another option. You get better affordability from this resin although it produces powerful chemical scents which require effective ventilation. Artists select it for their substantial works because it has fast drying capabilities.
The popularity of acrylic resin has risen due to its non-hazardous properties. This water-based material allows easy cleaning with its capacity to produce brilliant color results.
A second choice is UV resin that requires ultraviolet light to speed up its curing process. Resin works efficiently for petites such as jewelry or adorning tasks because it yields immediate results.
The different resin types present separate advantages that let artists make their selection based on project requirements.
Tools and Supplies Needed for Creating Resin Art
Building impressive resin artwork depends on having specific tools together with materials. Your first requirement should be high-quality epoxy resin to use as the base of your artwork. You should select a high-quality epoxy resin because it serves as the fundamental component of your artwork.
After acquiring epoxy resin you should select mixing cups along with stir sticks as your next purchase. Using these tools will allow accurate measurement and blending of resin content. Essential to the work is using gloves that will shield your hands when dealing with adhesive materials.
The removal of curing bubbles requires either a heat gun or a torch. Silicone molds along with diverse pouring techniques through multiple containers should be your choice for detailed details.
Add some color! The color schemes that you desire for your piece can all be found in pigments, dyes and alcohols among other ink variations. The addition of glitter together with dried flowers enhances visual beauty in the project.
The drying area should be flat and ready to use. The smooth surface provides an even cure because it prevents undesired tilting or spills from happening throughout the curing period. Every single element determines the form and final state of your artwork.
Step-by-Step Guide for Making a Resin Art Piece
Building impressive resin artwork depends on having specific tools together with materials. Your first requirement should be high-quality epoxy resin to use as the base of your artwork. You should select a high-quality epoxy resin because it serves as the fundamental component of your artwork.
After acquiring epoxy resin you should select mixing cups along with stir sticks as your next purchase. Using these tools will allow accurate measurement and blending of resin content. Essential to the work is using gloves that will shield your hands when dealing with adhesive materials.
The removal of curing bubbles requires either a heat gun or a torch. Silicone molds along with diverse pouring techniques through multiple containers should be your choice for detailed details.
Add some color! The color schemes that you desire for your piece can all be found in pigments, dyes and alcohols among other ink variations. The addition of glitter together with dried flowers enhances visual beauty in the project.
The drying area should be flat and ready to use. The smooth surface provides an even cure because it prevents undesired tilting or spills from happening throughout the curing period. Every single element determines the form and final state of your artwork.
Tips and Tricks for Achieving the Best Results
The outcome of your resin artwork depends greatly on your ability to reach perfect results. Several important pointers and techniques exist to enhance your artistic creations.
Use well-ventilated spaces for your work activities at all times. The inhalation of excessive resin fumes can result in adverse health effects to the body. A mask serves as an extra measure for protection during use.
The temperature conditions directly affect resin work during the production process. The optimal temperature range for resin success should be set between 70°F to 80°F (21°C to 27°C). The proper combination of resin with hardener results from this procedure that enables complete mixing and curing.
The mixing process requires exact measurements based on manufacturer guidelines where each part must match another part of resin with one part of the hardener. It takes at least three minutes of duration to mix the materials properly while minimizing bubble formation.
Use a heat gun or torch to lightly stir the surface after pouring because this will eliminate the formation of bubbles. High temperatures will fasten the discharge of trapped air trapped inside the mixture.
Experimentation is key! You should experiment with color mixing while adding materials such as glitter along with dried flowers and pigments to create distinctive resin effects.
Patience pays off. You should let your artwork cure for the specified amount of time indicated by the product guidelines to ensure both durability and shine quality.
Using these recommended methods along with experience will enable you to generate breathtaking art pieces that perfectly display resin beauty.


Leave a comment